Hardware Hacking! - Replacing the iPod Battery
This is an excerpt from "Hardware Hacking: Have Fun While Voiding
the Warranty".
You can find out more about the book at www.syngress.com/catalog/sg_main.cfm?pid=2870
Sooner or later, it will come time to replace your iPod’s battery. Li-Ion power cells are a big improvement over older battery chemistries, but they are not infallible. Eventually your iPod’s battery will no longer hold a charge or it will be sufficiently weak where you’re not getting nearly as much time out of your iPod as you did when it was new. When that time comes, you have three choices:
1. Throw out your iPod and buy a new one Apple would love you to choose this option, but most people do not consider the iPod a “disposable” item, given its high price tag. Thus, this is not an option for the majority of people.
2. Send your iPod to Apple and pay them to replace the battery Apple recently began a program whereby you can send them your iPod and, for $99 (plus shipping and sales tax if applicable), they will replace its battery. Besides being relatively expensive, this choice deprives you of your iPod while you’re waiting for Apple to return it. Also, Apple makes no guarantee that you’ll receive your original iPod back.
... continues below ...
3. Open your iPod and replace the battery yourself Several companies sell iPod batteries for around $50 and often include a tool (a screwdriver or plastic implement) that you can use to open your iPod. Once you have the device open, swapping the old battery for a new one is relatively trivial. Opening the iPod is the hard part.
Since you’re reading a book on hardware hacking, we’ll assume that you’re opting to replace the battery yourself.
Need to Know…
iPod Battery Lawsuit?
Just before this book went to press, the law firm of Girard Gibbs & De Bartolomeo LLP posted a page on its Web site called “Investigation of Apple’s iPod.” The firm indicated that it is “investigating a potential class action against Apple Computer, Inc., on behalf of iPod owners whose batteries have died or lost their ability to hold their charge.” The Web page has since been taken down, but while it was up the firm was asking iPod users who experienced problems with their battery to submit information via a form on the page.
After the page was posted, Apple began offering a battery replacement program, but it’s unclear if this potential litigation had any influence on Apple’s decision to set up the program.
Preparing for the Hack
For this hack, all you need is a tool to open the iPod (a small, flat-head jeweler’s screwdriver, a firm piece of thin plastic, or something similar) and a replacement battery.
To demonstrate this hack, we ordered new batteries from Laptops for Less (www.laptopsforless.com) and PDASmart (www.pdasmart.com). At the time of this writing, the batteries cost $50 to $60 each, plus shipping. PDASmart also offers a mail-in service that is less expensive than Apple’s battery replacement program. You can also find iPod batteries for sale on eBay, but if you go this route you need to be careful not to end up purchasing a used battery that might be in worse condition than the battery you intend to replace.
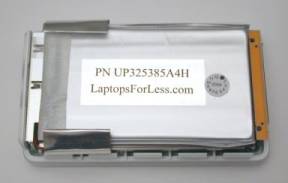
When ordering a battery, it is important that you order the correct type of battery for your iPod. First- and second-generation iPods use one type of battery, and third-generation iPods use another. The two different battery types are shown in Figure 11.16.
Need to Know…
Apple made many changes to the iPod when it designed the third-generation models, the battery being one of them. Third-generation iPods have a much smaller battery than earlier models, presumably to reduce the thickness of the iPod. Although Apple certainly succeeded in making the newer iPods thinner, the third-generation iPods have a noticeably shorter battery life as a result. Figure 11.16 shows the difference in size between the two batteries.
When ordering a new battery for your iPod, you want to make sure you specify the correct battery type. You’ll be pretty disappointed if you open your iPod up only to discover that you ordered the wrong battery.
Figure 11.16 iPod Batteries: First- and Second-Generation (Top) and Third-Generation (Bottom)

Since the battery and internals are unique between first- and second-generation iPods and third-generation iPods, we will describe battery replacement separately.
Battery Replacement: First- and Second-Generation iPods
Follow these steps:
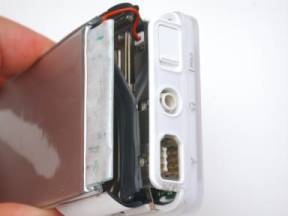
1. The first thing you’ll want to do is open your iPod, as described in the first section in this chapter. Once you have the iPod open, put aside the metal half of the case and place your iPod face down on a flat surface, as shown in Figure 11.17. The battery is sitting on top.
Figure 11.17 The First-Generation iPod Opened and Ready for the Hack

Add an arrow to point out the battery and battery connector?
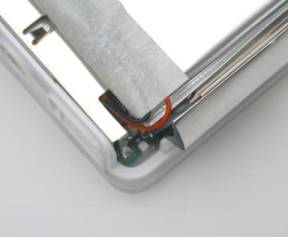
2. The battery is connected to the iPod motherboard by a power connector visible at the lower-left corner of Figure 11.17. Holding the battery in place are two thin rubber strips at both ends of the iPod, sandwiched between the battery and the hard drive (which is directly underneath the battery). Figure 11.18 shows one of these strips at the top of the iPod. In this picture, you can also more clearly see the battery power cable plugged into the motherboard.
Figure 11.18 Rubber Strips
Add arrow to point out rubber strip. I thought it was the white thing until I looked closer.
3. Using a screwdriver, carefully pry between the hard drive and the battery, undoing the glue on the rubber pieces, as shown in Figure 11.19.
Figure 11.19 Prying the Battery from the Rubber Strips

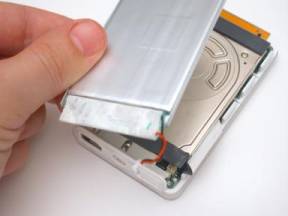
4. Once you have separated the battery from the rubber strips, you can unplug it from the iPod motherboard and properly dispose of it (see Figure 11.20).
Figure 11.20 Removing the Old Battery
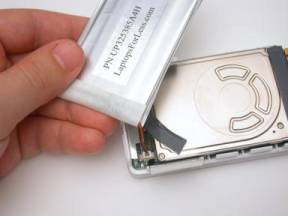
5. With the old battery removed, you can now swap in the new battery that you purchased (see Figure 11.21). Orient the new battery in the same direction as the old battery. Plug the power connector into the iPod motherboard, taking care as you insert the connector. The connector will fit in only one orientation; so do not force it into place. For easier access to the connector on the motherboard, you can temporarily move aside the rubber strip that partially covers it.
Figure 11.21 Connecting the New Battery
6. With the new battery connected, move the rubber strip back into place (if you moved it out of the way) and firmly attach the battery atop the hard drive, as shown in Figure 11.22.
Figure 11.22 Affixing the Battery to the Hard Drive
7. Take care that the power cable is tucked away at the top of the iPod (see Figure 11.23).
Figure 11.23 Power Cable Safely Tucked Away
8. Once you have the battery securely attached into place, you can reattach the cover (see Figure 11.24). The metal cover should snap easily into place. If it does not, make sure there are no obstructions before you attempt to close the cover.
Figure 11.24 Reattaching the Metal Half of the Case

9. Once you have your iPod back together, you’ll want to charge the battery for a minimum of three hours before using the device (see Figure 11.25).
Figure 11.25 Charging the New Battery

Bookmark:
post to Delicious Digg Reddit Facebook StumbleUpon
Recent on Mstation: music: Vivian Girls, America's Cup, music: Too Young to Fall..., music: Pains of Being Pure At Heart, Berlin Lakes, music: Atarah Valentine, Travel - Copenhagen, House in the Desert
front page / music / software / games / hardware /wetware / guides / books / art / search / travel /rss / podcasts / contact us